A few months ago I received an STM32F3DISCOVERY evaluation board, similar to the STM32F4DISCOVERY that I’ve used for prototyping at work, but for the new STM32 F3 series Cortex-M4. Since ST doesn’t provide a development environment like TI and NXP do, and the commercial packages available are expensive and windows only, I’ve decided to put up a step-by-step tutorial on how to setup an opensource environment for Mac OS X based on eclipse, GCC ARM and openOCD.
All the packages are multi-platform, so it should be easy to configure a similar environment for Linux or Windows.
Download and Install the GCC ARM toolchain, Eclipse IDE + plugins and OpenOCD
GNU Tools for ARM Embedded Processors
The first thing you need is a toolchain. The GCC ARM is maintained by ARM employees, and is the best open source compiler you can find. It includes the debugger GDB. Download the mac installation tarball of the 4.7 series release and uncompress it in your home folder, no installation needed.
Eclipse IDE
A lot of the closed source IDE used in ARM development are heavily based on the Eclipse IDE. Download the last version (currently Kepler) of the Eclipse IDE for C/C++ Developers package, selecting the Mac OS X 64 Bit version, and uncompress it in your home or applications folder.
Now open Eclipse and install the plugins needed: Eclipse CDT, GNU ARM and Zylin embedded CDT.
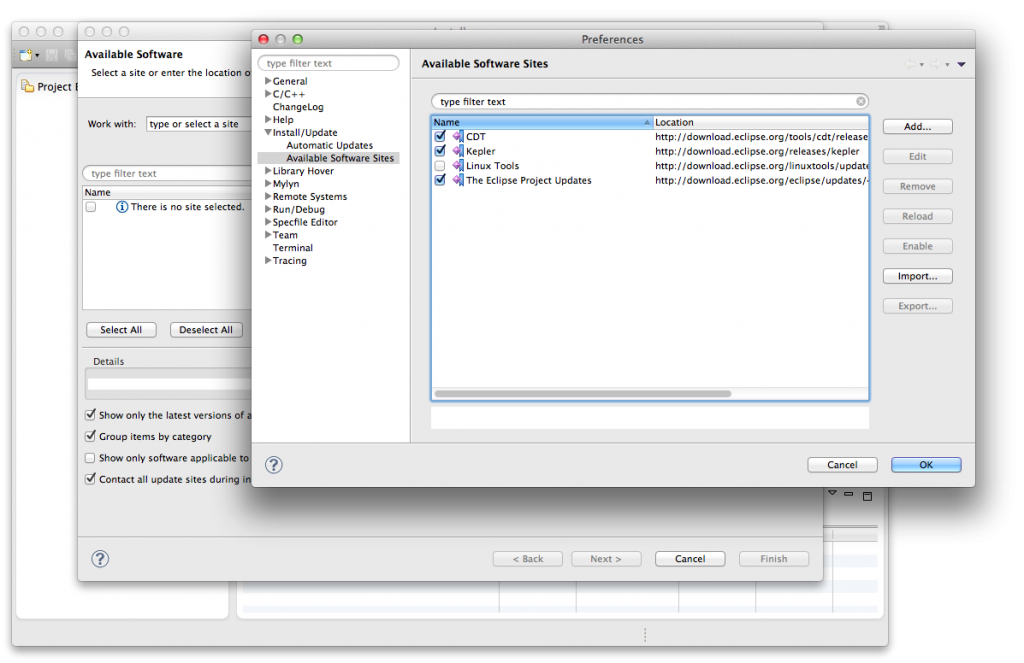
Go to Help > Install New Software. Click on the “Available software sites”, select the CDT checkbox and click OK.
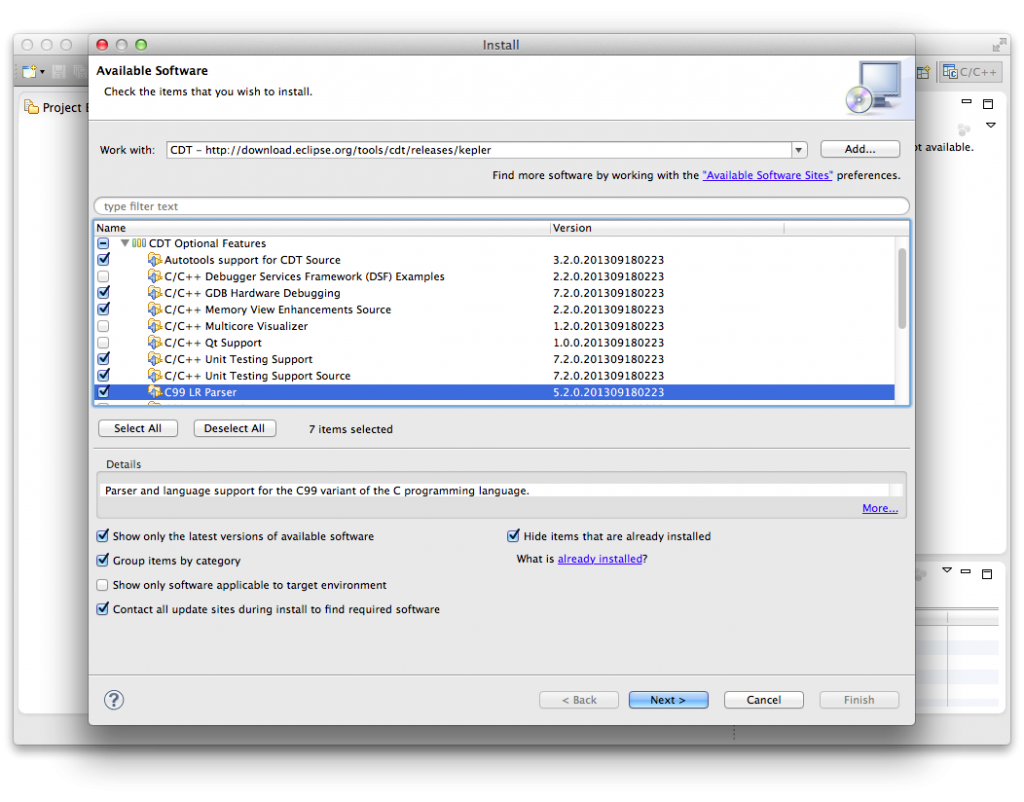
Select CDT from the Work with: dropdown and the packages will appear below. Click all the CDT Main Features and from the CDT Optional Features the ones that are selected in the following image.
Click Finish and the plugins will download and install.
Next we will install the GNU ARM plugin. Click again on Help > Install New Software and now click on the Add… button next to the top dropdown, to add a new repository. Insert the location http://gnuarmeclipse.sourceforge.net/updates and click OK. The component “CDT GNU Cross Development Tools” will appear below. Select and install it.
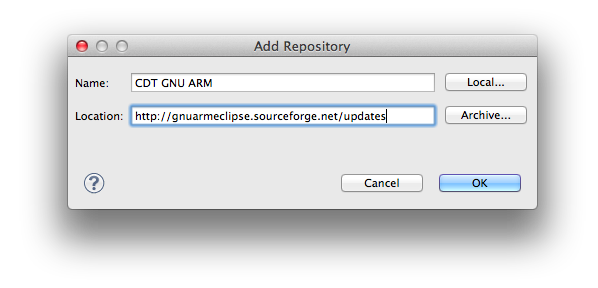
Finally, repeat the process to install the Zylin Embedded CDT plugin, necessary to debug and flash. Add the repository with the location http://opensource.zylin.com/zylincdt and install the component “Zylin Embedded CDT”.
OpenOCD
OpenOCD is an open on-chip debugger and progamming tool. It will communicate with gdb to debug and flash the board by using the stlinkv2 debugger. The easiest way to install it is using Homebrew, a pacakage manager for OS X similar to MacPorts or Fink. If you don’t use Homebrew already, follow the one-step installation instructions on its website. After that, open a Terminal and paste the following line:
brew install openocd --enable_ft2232_libftdi --enable_stlink |
Once installed, you have to create an empty file called stm32f3discovery.cfg in your home folder, and paste the following lines:
# Script for connecting with the STM32F3DISCOVERY board source [find interface/stlink-v2.cfg] source [find target/stm32f3x_stlink.cfg] reset_config srst_only srst_nogate |
To be able to run OpenOCD inside Eclipse, you have to add it clicking in the menu Run > External Tools > External Tools Configuration…. Create a new item clicking in the New launch configuration icon and fill in the location, working directory and arguments as in the following image and click Apply. The working directory will be where you created the stm32f3discovery.cfg file.
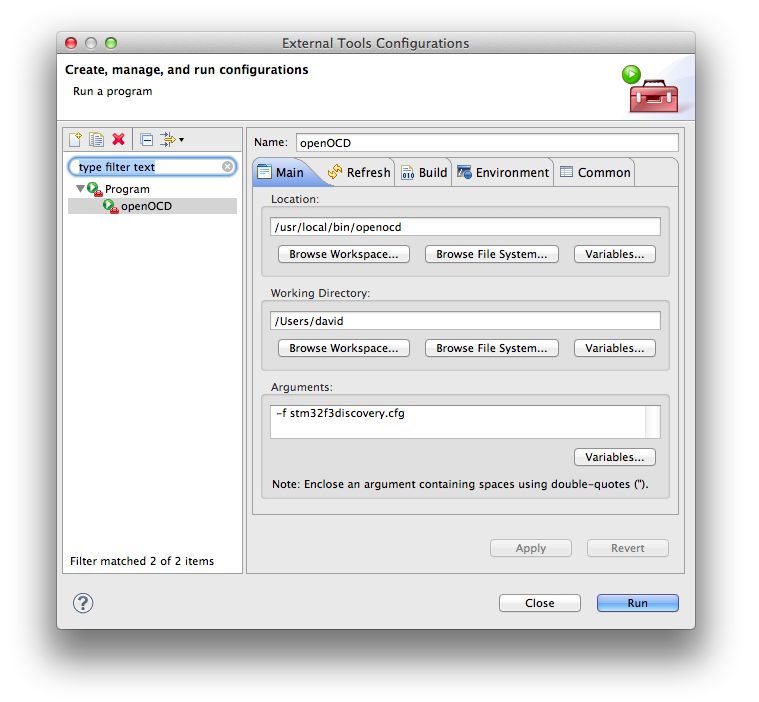
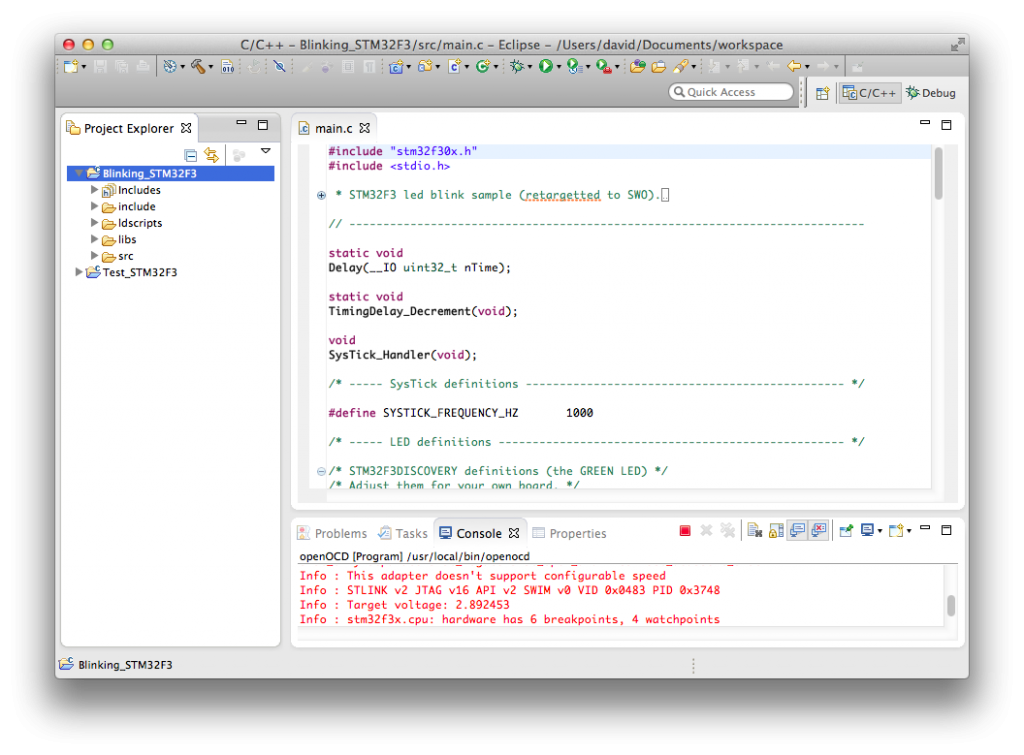
Now connect your STM32F3DISCOVERY board to the computer and click the Run button. If everything is correct, you will see in the console something similar to this:
Info : This adapter doesnt support configurable speed Info : STLINK v2 JTAG v16 API v2 SWIM v0 VID 0x0483 PID 0x3748 Info : Target voltage: 2.892453 Info : stm32f3x.cpu: hardware has 6 breakpoints, 4 watchpoints |
Every time you start Eclipse, you will need to start OpenOCD with Run > External Tools > OpenOCD. When you exit Eclipse, it will kill the OpenOCD daemon. If for some reason it is still running, paste in a Terminal the command killall openocd.
Creating a new project
After installing all the packages, we are going to create a blinking led example project.
First, click on File > New > C Project and select Executable > STM32F3xx StdPeriph Lib v1.0 C Project and Cross ARM GCC. Give it a name, for example Bliking_STM32F3.
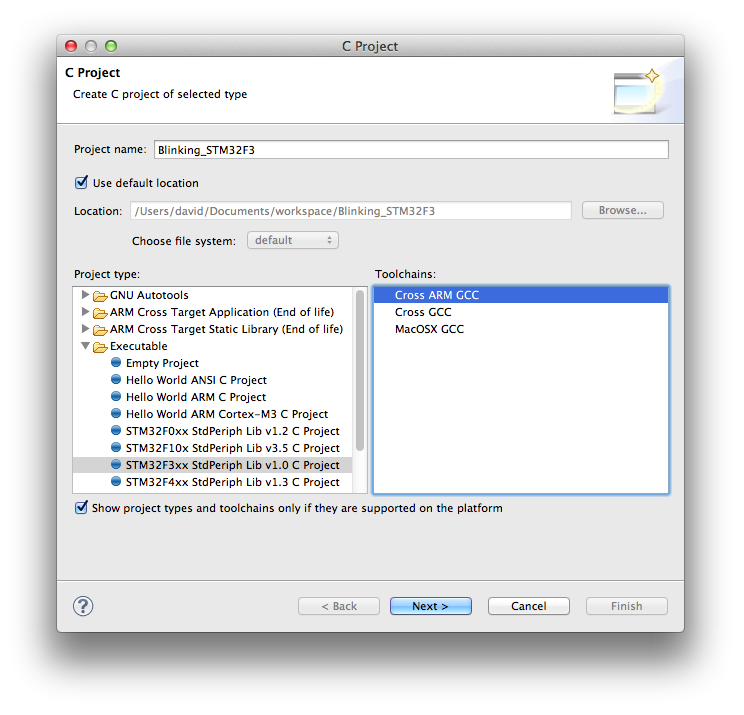
Click Next several times, leaving the default options, until you reach the last step, where you select the toolchain name and path, as you can see in the image. You will have to browse for the path of the bin folder where you installed the GCC ARM Toolchain.
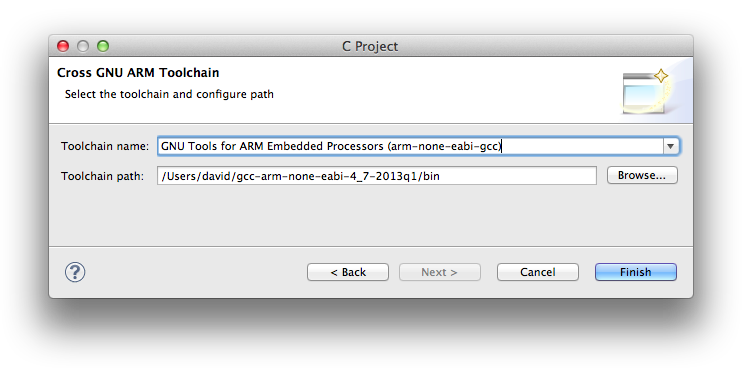
Click Finish and the project will be created.
For now, you can leave the example code as is, but you need to comment the printf lines, since OpenOCD doesn’t seem to support retargeting for this board at the moment.
Another thing we should do is enable the FPU unit, that is disabled by default. Go to Project > Properties and select C/C++ > Settings on the left tree. In the Tool Settings, click on the Target Processor item. On the right dropdowns, select the “FP instructions (hard)” option of the Float ABI menu, and “fpv4-sp-d16” of the FPU Type and click OK.
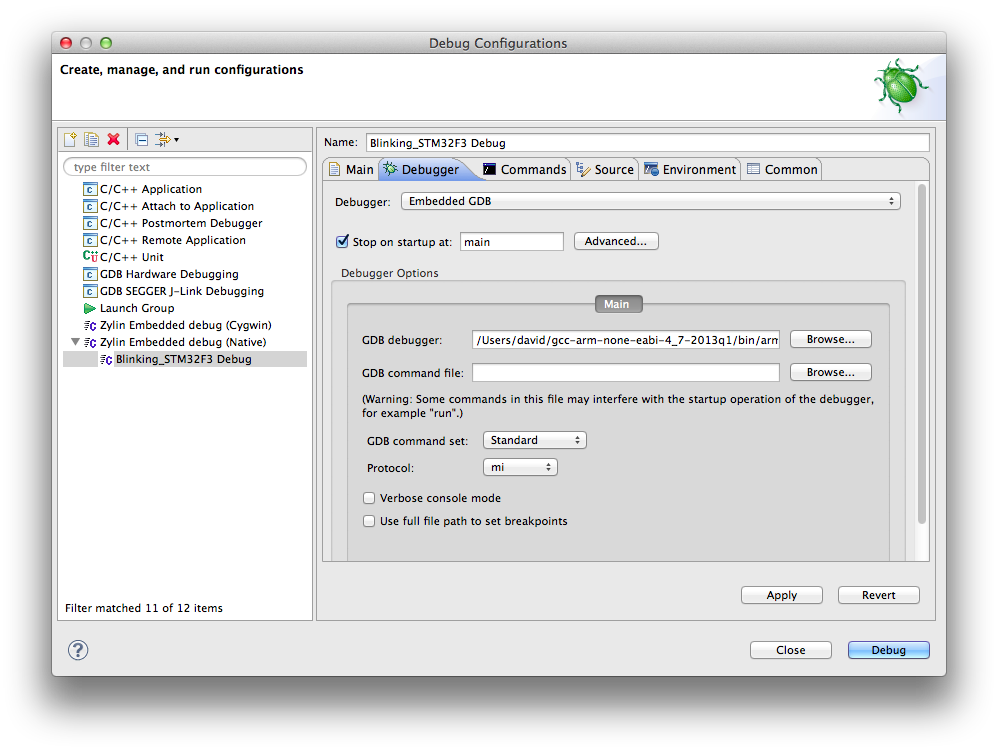
After that, click on Project > Build Project. Now that the program is compiled, the only thing left is to add a debug configuration. Click on Run > Debug Configurations… and double-click on Zylin Embedded debug (Native). On the “Debugger” tab, click on the GDB debugger field and browse to select the gdb executable of the GCC ARM toolchain. It will be something like PATH_TO_GCC/bin/arm-none-eabi-gdb.
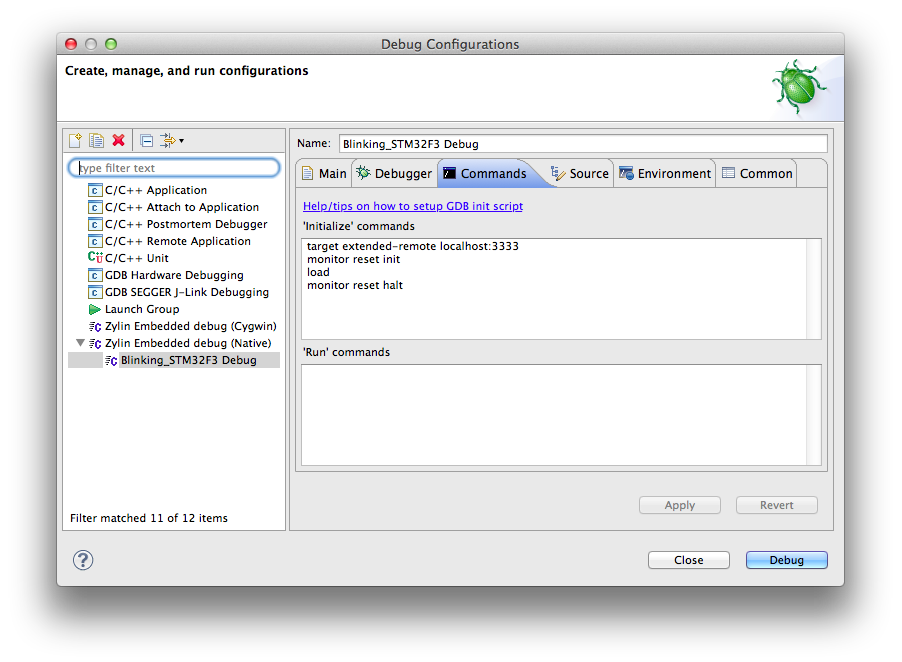
Finally, go to the “Commands” tab and paste this in the ‘Initialize’ commands box:
target extended-remote localhost:3333
monitor reset init
load
monitor reset halt |
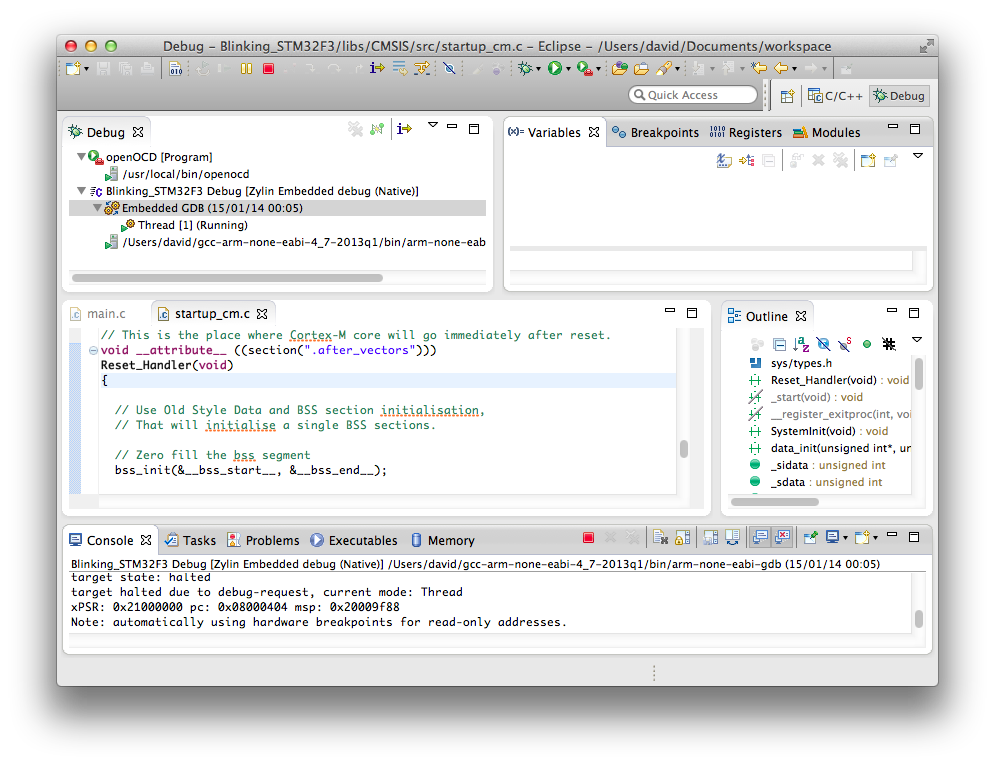
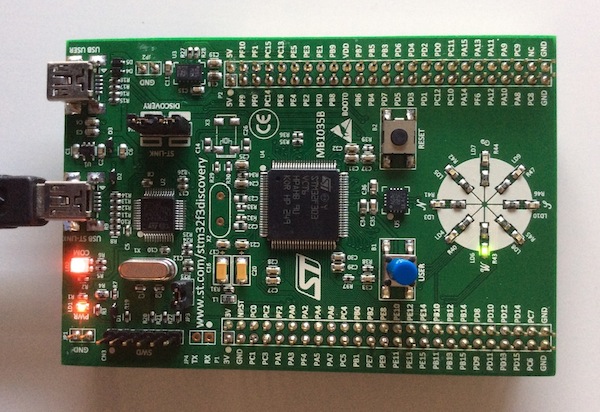
Click Apply and then Debug. The debugging session will start, Eclipse will switch to the Debug perspective and the program will be downloaded to flash. Then, when you click on the Resume (F8) icon, the program will start executing, stopping at main. Clicking again on Resume will continue the execution. If everything is configured correctly, you will see the green led flashing on your board. You can pause/stop the execution, set breakpoints and watch variables and registers.
Good post, just a few comments with regards to the OpenOCD side of things.
Rather than using ‘target remote’ use ‘target extended-remote’. With extended remote you are able to use the cmds ‘run’ and start’.
‘start’ enables you to reset and run your target breaking at main, ‘run’ just does not set the breakpoint.
For info ‘reset init’ will reset and halt your target, then execute the reset-init script if any. There is no reason
to issue a ‘halt’ after a ‘reset init’ or ‘reset halt’.
Should not have to pass elf filename to load, gdb should get that from eclipse.
Should not have to disconnect from gdb, after a load just issue a ‘mon reset halt’
Just for info using ‘mon reset’ and ‘mon halt’ is generally not the same as using ‘mon reset halt’. The latter may run
your target code before halting the target. Instead use ‘mon reset halt’ as it will reset and halt your target at the reset vector.
Thanks for the info! I’m very new to OpenOCD/GDB. I looked around and tweaked the commands until it worked as I wanted. I’ve tried your suggestions and they work perfectly, much simpler. I’ve updated that part of the post accordingly.
[…] because it seems to have the right plugins and resources. In particular I have been inspired by this post for developing on STM32F3Discovery on Mac OS X using Eclipse and this post for Windows. I suppose there are many alternatives that are probably simpler and […]
Thanks for this! Works like a charm.
I am using the STM32F0, so I just made a stm32f0discovery.cfg instead.
When I installed openocd using homebrew, for some reason “–enable_ft2232_libftdi –enable_stlink” were not getting passed to configure. Adding “–with-libftdi –with-libusb” fixed it. So the homebrew command I used:
brew install openocd –enable_ft2232_libftdi –enable_stlink –with-libftdi –with-libusb
the home-brew command did also not work for me. I just then used a ready to go install packet
http://gnuarmeclipse.livius.net/blog/openocd-install/
Hi,
Thanks for the guide! You’re THIS CLOSE to getting it to work for me. Unfortunately I’m getting the following error when I run openocd and the run terminates at that point.
Runtime Error: embedded:startup.tcl:47: Can’t find stm32f3discovery.cfg
in procedure ‘script’
at file “embedded:startup.tcl”, line 47
Do you know what might be causing this?
The path to stm32f3discovery.cfg is probably wrong or filename misspelled. check that the file exists in home directory. You can also try starting openocd from the command line:
openocd -f ~/stm32f3discovery.cfg
Hi Owen,
I never got the reply notification! Thanks for it anyway.
Yes, it turns out that unfortunately, when I created the .cfg file in textedit, mac through in a .rft which was hidden from me by default – worst thing ever.
Thanks for the help!
Unfortunately, I am having difficulty with the debugger. I am receiving the following error:
target extended-remote localhost:3333
localhost:3333: Operation timed out.
monitor reset init
“monitor” command not supported by this target.
load
You can’t do that when your target is `exec’
monitor reset halt
“monitor” command not supported by this target.
Any advice?
Thanks again!
Having problems with this section,
“Another thing we should do is enable the FPU unit, that is disabled by default. Go to Project > Properties and select C/C++ > Settings on the left tree. In the Tool Settings, click on the Target Processor item. On the right dropdowns, select the “FP instructions (hard)” option of the Float ABI menu, and “fpv4-sp-d16″ of the FPU Type and click OK.”
FPU type and Float ABI drop-down menus are both grayed out. Do you know what could have gone wrong? How could I get past this?
Thank you!
I can’t seem to find out why i can’t resume the target board when debugging with openOCD. If i run the program on the board it works fine.
Thanks
[…] Source […]
How do i run the code the the second time on the STM32F3DISCOVERY?
Probably needs a guide by it self. there seems to be lots of processes that needs to be stoped and so on?
is there a way to just compile and upload the code without debug?
Eclipse spits out a .elf file in the Debug folder of project, and this can be uploaded to the board directly with openocd. I’m using STM32F4 board, but should be same for F3:
open a terminal and start openocd:
openocd -f stm32f4discovery.cfg
open another terminal and connect to openocd with telnet:
telnet localhost 4444
now you can command the board directly. So these commands will erase and upload program to flash:
> halt
> flash erase_sector 0 0 last
> halt
> reset
> halt
> flash write_image /Users/PATH TO ECLIPSE PROJECT/Debug/STM32F0_SPI_I2S.elf
I can’t remember why I used so many halts and resets, I think that was the combo that ended up working, so I save it. Probably this could be put in a script or something to save typing…
Strange, I wrote the elf image to my STM32F0-Discovery board following the instructions in Owen’s post.
The led starts flashing. So far so good.
But when I exit both terminal sessions the code stops working and the led stays green.
Does stm32f4 work the same way? Thx.
Yes, it should work the same way, just selecting the STM32F4XX periph when you create the new project, and stm32f4x_stlink.cfg as a source target in the OpenOCD target configuration.
I got an error when I try to build the project. Here is the error message.
cc1: error: argument to ‘-O’ should be a non-negative integer
It seems like there is some problem with the Cross ARM C Compiler. Do you have any idea why this is happening?
Thanks
Thank you in advance with below debugging problem.
(gdb)
277 load
&”load \n”
load
&”No executable file specified.\n”
&”Use the \”file\” or \”exec-file\” command.\n”
No executable file specified.
Use the “file” or “exec-file” command.
277^error,msg=”No executable file specified.\nUse the \”file\” or \”exec-file\” command.”
I liked your step by step demonstration. But i want to know from where i can download it? Suggest some sites.
Great post! Thanks!
Has anyone noticed when hovering over a reference to a register. For instance, using STM’s provided peripheral drivers, if I hover above USART1->SR to read the status register, I cannot see its contents. With the same setup on windows I am able to see the contents of this register or even the Entire USART peripheral space…
Hey,
i just followed your instructions and everything is working. But when i am debugging, i can’t see the peripheral registers. do you have any idea, why i can’t see them?
Cheers
Lucky for you this was recently added. Go to the gnu arm eclipse plugin website, add the repo to eclipse and install the new packs installer. You’ll need to switch to the packs perspective, defray the list, download the pack for whatever micro you are using. Then select that micro in your project’s settings. I believe there will be a new tab in build settings for MCU. One you’ve selected that. The peripheral registers information will be available.
i switched to the packs perspective, but i don’t know where to download the package for my micro?
There will be a refresh button top left of the window packs window. Yellow arrows
[…] http://www.davidrojas.co.uk/stm32f3discovery-on-mac-os-x-using-eclipse-gcc-arm-and-openocd/ […]
[…] STM32F3DISCOVERY on Mac OS X using Eclipse, GCC ARM and OpenOCD […]
Hello,
I’m getting crazy with this device, can you please help me ? I made exactly as you said (I have a macbook OS El Capitan version 10.11.14, eclipse mars.1), and I have the following message : “none separate
srst_only separate srst_nogate srst_open_drain connect_deassert_srst
Info : Unable to match requested speed 2000 kHz, using 1800 kHz
Info : Unable to match requested speed 2000 kHz, using 1800 kHz
Info : clock speed 1800 kHz
Error: open failed
in procedure ‘init’
in procedure ‘ocd_bouncer’
”
Can you please help me debug this ? I plugged and unplugged my usb cables, changed the board…
I’m getting this error when trying to download Zylin Embedded CDT
Missing requirement: Zylin Embedded CDT 4.18.1 (com.zylin.cdt.feature.feature.group 4.18.1) requires ‘org.eclipse.cdt.debug.mi.core 0.0.0’ but it could not be found
Any clue why this could be happening? I don’t know what it means 🙁
Same. It looks like it’s no longer on the Zylin site anymore. I emailed someone from Zylin and got a response: “This is a very old plugin that you can probably do without if you use the latest Eclipse CDT.” But the Zylin embedded debug is not an option so I’m thinking this procedure is no longer valid unfortunately.
I think this install tutorial is expired. I followed this and got it to work:
http://gnuarmeclipse.github.io/install/
This isn’t as build/date dependent as this site.
[…] instructions involving messing about with MacPorts and Homebrew with the F4 board on Mavericks from here, here, and here! (The last one is probably the most useful since we will need to return to Eclipse […]
[…] I found this post by David Rojas: STM32F3DISCOVERY on Mac OS X using Eclipse, GCC ARM and OpenOCD. Seems to be almost exactly what I was looking […]